Tuesday, November 19, 2013

Chocolate Covered Bananas

 
Okay, these have got to be one of the easiest things in the world to make, especially with kids, and such a fun result.  All you need are bananas, melted dark chocolate (the darker the better), and chopped nuts of your choice.
 
 
Line a baking sheet or tray with wax paper and cut up the bananas into slices - as thick as you want.  I even let the kids to this with a plastic knife.  Dip them in the melted chocolate and immediately sprinkle with nuts.  My kids like cashews and almonds the best, but any kind of nut would taste great. (I usually melt my chocolate by cutting it into small pieces and microwaving it at 30 second intervals while stirring in between until fully smooth - don't go too long or it will burn)
 

Place the finished tray in the freezer for at least 30 minutes.  Then you are ready to pop these in your mouth for a snack or quick dessert.  So fast and so satisfying.  My kids go nuts over these and they are so quick and easy to make that I basically can say "yes" whenever they want to make them.  And truth be told, I've even started to just spoon chocolate over the tops and not even worry about picking them up to get the bottoms covered.  It's even faster and tastes just the same!

Clean Caramel Sauce

 
I once thought that eating processed free meant some foods would just be off limits - like caramel sauce.  It's basically melted sugar, right?  But, here is where swapping in a smart and healthy way can allow you to eat almost anything.  Let me just tell you how great this caramel sauce is.  It's smooth, rich, and tastes just as good or better than a traditional caramel.  The recipe is also fast and easy too! 
 
1 cup coconut sugar or sucanat
1/2 cup half and half
4 Tbsp. butter
pinch of salt
1 Tbsp. vanilla extract
 
Pour the coconut sugar/sucanat, half and half, butter and salt into a saucepan and heat on medium low.  Whisk for about 5 to 7 minutes until everything is combined and starts to thicken - it will be bubbly. 

Add the vanilla and cook one more minute.  Take the pan off the heat and let it cool a little.  You can use it warm or store it in an air tight container and store it in the refrigerator. 

This tastes great even cold - promise!  Now you can have caramel on anything you want.  I like it on a clean ice cream (here's mine) or one of my new favorites, salted caramel brownies.  Just make some clean brownies (here's mine), drizzle the top with the caramel sauce, and sprinkle course sea salt on top - amazing!!


Wednesday, September 4, 2013

Vegetable Parmesan


Are you looking for recipes that include more veggies? I'm always on the lookout to bump up this important food group in my families meals.  This vegetable parmesan is meatless and stars plenty of vegetables with a terrific Italian flavor profile.  I got the basic recipe from Giada and changed just a few ingredients to make this perfectly processed free and delicious!
 
Coconut oil
Sea salt and pepper
1 medium eggplant
2 fennel bulbs
3 bell pepper (preferably all different colors)
1 (26 oz.) jar marinara sauce (no sugar added)
3 cups shredded mozzarella cheese
1 cup freshly grated parmesan
1/2 cup whole wheat panko or whole wheat bread crumbs
 
Slice the eggplant and fennel into 1/4 to 1/2 inch thick slices.  You may want to discard a few of the outside layers of the fennel bulbs to make them more tender.  Cut the peppers into flat strips.  Don't they all look beautiful? 
 

Now you will do one of two things.  You can either grill all the vegetables or bake them in the oven.  I chose to grill mine like the original recipe.  You want to grease your grill or grill pan with coconut oil and season the vegetables with salt and pepper.  Grill them for about 3 to 4 minutes on each side or until they have softened.  If you don't want to grill them, put them in a baking dish at 375 degrees for 15 to 20 minutes or until soft.  Don't forget to still season them.  I like the flavor that grilling them offers, but do whichever is easiest.


Just a quick note: you could always grill or bake these in advance and assemble the rest of the casserole later.  Preheat the oven to 375 degrees.  Now your ready to create the layers.  Spread 1/3 of the marinara in the bottom of a 9 X 13 inch baking dish that has already been greased with coconut oil.  Arrange a layer of eggplant slices and sprinkle 1 cup of mozzarella and 1/3 cup of parmesan over the top.  For the second layer, add the bell peppers, followed by another 1/3 of the marina, 1 cup of mozzarella, and 1/3 cup of parmesan.  For the last layer, add the fennel and top with the remaining sauce and cheeses.  To finish it, sprinkle on the bread crumbs.  You can drizzle a little olive oil on top too.  Bake for 30 to 35 minutes or until the top is golden.  Cool for 10 minutes before serving.       


Saturday, August 31, 2013

Pesto Pasta Salad


Being part Italian (thank you mama), I love pasta and anything with fresh basil.  Pesto sauce has got to be one of my all time favorite sauces and I find that you can add it to almost anything for a punch of fresh flavor.  If you're looking for a quick dinner or the perfect side dish for an outdoor party, give this a try.  I'll give you a rough outline, but taste as you go and add more or less of anything you want.

1 lb. whole wheat pasta, cooked
1 pint of cherry tomatoes, halved
3/4 cup of shredded mozzarella or 4 to 6 string cheese sticks sliced
1 cup or more of pesto sauce
3 Tbsp. freshly grated parmesan cheese

Combine everything in a large bowl and taste as you stir everything together.  I like to look at the proportions too and decide if it looks prettier with more tomatoes or cheese.  Again, add or subtract what you prefer - this is rough outline.  If your pasta is still hot, the cheese will melt.  That's great if that's what you want, but if you want the shredded or chunks of cheese to keep their shape, let the pasta cool first.

If you want a good recommendation for a store-bought pesto sauce, try the basil pesto from Costco.  I love this one because it's ingredients are processed free and in terms of color and taste, I have to say it rivals even my grandmas fresh pesto and that's saying something! 

Here is my grandma's recipe if you want to make some from scratch:

2 cups coarsely chopped fresh basil
1 clove of garlic
1/4 cup grated parmesan
1/4 cup grated romano
1/2 tsp. salt
pepper to taste
1 cup olive oil
2-3 Tbsp. pine nuts

Put all the ingredients in a blender or a food processer and combine until smooth.  Don't just limit this sauce to pasta.  Spread it on bread, pour over fish or chicken, use as a pizza sauce, spread on wraps or sandwiches, add to scrambled eggs, add it to soup, use as a salad dressing, top cooked veggies, use as a dip, mix it with mayonnaise, the possibilities are endless!  You can also freeze it and always have it on hand.  This makes for a quick dinner in a pinch that tastes great.

Cooking Brown Rice in the Rice Cooker


If we have rice with a meal, I never make white rice anymore.  I actually prefer the nutty taste and chewy texture of brown rice better.  It just happens to be processed free and more nutritious too - score!  Homemade rice is also really cheap and easier on our family budget than pre-cooked.  But, I always have had trouble making brown rice on the stove top and not having it be constantly watched, take a long time or turn out badly over or undercooked.  That's when I discovered you could cook it in your regular old rice cooker!  Talk about easy.  You pour in the rice and water, turn it on and walk away.  Cooking can't get any simpler.  It does take more time than white rice (I figure about 1 hour) and more water, so I start the rice first and then time the rest of my cooking so that my whole meal is done together.

Here are some rough estimates for water and rice ratios:

                                       Water                    Rice
White (long grain)         1 3/4 cups                  1 cup
Brown (long grain)          2 1/4 cups                 1 cup

For brown rice, you can see more water is needed.  Depending on your cooker you might need even up to 3 cups.  Start with less, and if your rice is undercooked, just add more water and restart the cooker.  Some people prefer to presoak their rice or rinse it before cooking.  I usually don't bother, but you can if you want.

Want more flavor?  Consider adding a bay leaf, cardamom pods or star anise - you would discard all of these after cooking.  They will infuse your rice with delicious and unique flavors.  Or use chicken broth or coconut milk in place of some or all of the cooking water.  Yum-O!  I hope you never shy away from making brown rice again.

Wednesday, August 28, 2013

Peanut Butter Bumpers Cereal

 
We buy pretty healthy low or no sugar cereals at our house most of the time, but when the kids want a "treat" cereal, this is the one we buy.  It's called Peanut Butter Bumpers by Mothers brand and I think it tastes most like Peanut Butter Captain Crunch.  Please don't misunderstand me, I'm not trying to pass this off as the most healthy cereal, but it doesn't have refined sugar or wheat flour in it and boasts ingredients that I have at least heard of.  Here is the whole ingredient list: corn flour, unsulphured molasses, natural peanut butter (ground peanuts, salt), oat flour, rice flour, honey, salt, and vitamin E.  Better, right?  So, it does have sugar, but all natural sweeteners that your body can more easily recognize and digest.  I have found this at most health food stores, but even some local grocery stores carry it too.  I've even found it at my local Target store!  If your local grocery store has a health food section, you may also find it there too.  Try swapping this for one of your other sugary-treat type cereals.  You may just like it better!

Tuesday, August 20, 2013

Coconut Flour Brownies


 So, I've been experimenting more with coconut flour.  The results have been mixed.  Some recipes I like, and some I don't.  This recipe for coconut flour brownies, is one that I do like.  I don't remember where I got the original recipe, but I didn't have to change much seeing as it was already a mostly processed free mixture.  You can taste the undertones of coconut in this, so if you like that flavor, you will love these brownies!
 
1 cup + 2 Tbsp. unsweetened cocoa powder
1/2 cup + 2 Tbsp. coconut oil (melted)
3/4 cup honey or pure maple syrup
3 eggs
1/4 cup coconut flour
1/4 tsp. sea salt
1 tsp. vanilla
 
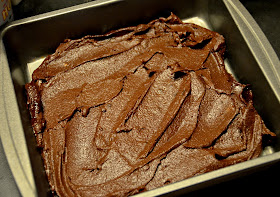
Preheat the oven to 350 degrees.  Grease an 8 X 8 inch baking dish with coconut oil.  Mix all the ingredients in a bowl until they are smooth.  Spread the batter all over the baking dish.  It will be thick as the picture shows, so make sure to spread it evenly all over including the corners.
 
 
Bake for 17 to 20 minutes.  You want it to be moist and not too dry.  Go for a lower cooking time to make these really fudgy!
 
 
Let them cool completely then cut and enjoy!  You can even put them in the refrigerator to help this process along.  I also think they cut best with a plastic knife.  No refined flour so these are gluten free, and no refined sugar so they are much healthier.  Now that's a great dessert!

Thursday, May 23, 2013

Orange Molten Chocolate Cake


I was watching food network which is one of my favorite channels, even though I rarely get to watch it with kids around, and Melissa d'Arabian made this orange chocolate lava cake.  It looked so simple and elegant, but was super easy.  I knew that with a few math conversions, I could turn this into another delicious processed free dessert to have on hand.  I love the combination of chocolate and orange, and if you do to, then you've got to try this! 

Makes 4 individual sized cakes:

4.5 oz bakers chocolate
4 1/2 Tbsp. sucanat
4 Tbsp. unsalted butter
1 Tbsp. coconut oil
zest of 1 orange

1/4 cup sucanat
1 whole egg plus 1 egg yolk
1 Tbsp. whole wheat pastry flour
1 tsp. vanilla extract
1 orange, cut into supremes (segments)

optional: sea salt for sprinkling, oil for drizzling

Preheat oven to 375 degrees.  Grease four sections of a muffin tin with coconut oil.  Melt the chocolate, sucanat, butter and oil in a bowl in the microwave at 30 second intervals until it stirs together smoothly.  Don't put it in too long or it will burn.  Stir in the orange zest and let cool.

In a medium bowl, whisk the sucanat, eggs and yolk for about 2 minutes.  Whisk in the melted chocolate mixture.  Stir in the flour and vanilla until it is all smooth.  Divide the batter into the four greased sections of the muffin tin.  Bake the cakes until just barely dry on top - 10 to 12 minutes.  Remove from the oven and let them cool for about 5 minutes.  

Gently flip them onto a plate.  Top with the orange segments.  You can also sprinkle on some sea salt and drizzle a little melted coconut oil or olive oil over the top as well.  

These will be a little crusty on the outside and gooey on the inside.  If you want it more lava-like, put it in for less time.  Enjoy!


Monday, April 29, 2013

Lime Marinaded Chicken with Basil Lime Sauce


I'm almost obsessed with any food that incorporates limes, garlic or basil and this recipe has all three!  One thing I've learned about being processed free is that you can still pack a lot of flavor in your food using fresh ingredients and you'd never think twice about what your eliminating from your diet.  True, most processed food is high in flavor, but that's because it's chemically altered to be addictive to your senses.  However,  you'll find that good, fresh, healthy food can be every bit as satisfying if you learn how to use these ingredients.  At least this is what I'm finding as we go through the journey of becoming processed free.  Give this chicken a try and I think you'll find that it's quite versatile too.  Once it's finished it can be put with practically anything, for example: salads, burritos, brown rice, pitas, tacos, pasta, etc.

For the marinade:
3 lbs. chicken breasts or tenders
zest and juice of 2 limes
3 Tbsp. extra virgin olive oil
3 Tbsp. Dijon mustard (with clean ingredients)
3 Tbsp. Worcestershire sauce
3 Tbsp. low sodium soy sauce
2 cloves of garlic, minced
salt and pepper

For the Sauce:
zest and juice of 1 lime
1/4 cup extra virgin olive oil
2 cloves of garlic, minced
2 - 3 Tbsp. freshly chopped basil

Place all the ingredients for the marinade in a gallon size zip top bag.  Squeeze the air out, close it completely, and squish the ingredients until everything is well mixed and the chicken is evenly coated.  I like to put the bag in a bowl and then place it in my refrigerator - the bowl ensures that it won't leak if there's a hole.  Marinade for at least 1 hour.  Grill the chicken until fully cooked (you can see I just used my grill pan, sprayed with coconut oil and did two batches) and let the meat rest for 5 minutes.  Cut up the chicken into bite-sized pieces, put them into a bowl, and pour your finishing sauce over the top.  Now it's ready to serve.


Monday, April 22, 2013

The Best Baking Powder


If you look closely at the label on this baking powder, you will notice it says aluminum free.  Once I ran out of my old brand, I started purchasing only aluminium free for a couple of reasons.  One is for taste.  If you've ever experienced any of your baked goods tasting a little "tinny," this was the reason why.  So, the simple fix is to switch baking powders.  The other reason I chose to bake with this instead is that there are some possible health risks due to over consumption of aluminum (ex. greater risk for Alzheimer's) and I would rather just cut out as much aluminum as I can, where I can.  If you can't find this, you can make your own, just do this in small batches.

Aluminum-Free Baking Powder
1 Tbsp. baking soda
2 Tbsp. cream of tartar
1 1/2 Tbsp. cornstarch (organic)

Mix together and store in an air-tight container.  Moisture will reduce it's effectiveness.  


Sunday, April 14, 2013

Coconut Cake with Coconut Cream Cheese Frosting


Do you like coconut?  Then you are going to love this cake!  I started to really love coconut when I spent an entire summer in Hawaii in my early twenties.  I couldn't seem to get enough of all things coconut.  As a result, I love all the products that come from this amazing plant.  This particular recipe calls for coconut flour, coconut oil, and shredded coconut to give it the rich coconut flavor without the need for artificial flavors.  I originally found this recipe here, and I didn't change it too much.  It has no refined sugar or flour and it's actually grain free.  It's super moist and tastes very sophisticated.  I promise you won't know this is processed free.


For the cake:
10 eggs
1 cup coconut oil, melted
1 cup pure maple syrup
1 Tbsp. vanilla extract
3/4 cup coconut flour
1 tsp. baking soda
1 tsp. sea salt
1 cup unsweetened shredded coconut
 
Preheat the oven to 325 degrees.  In a large bowl combine the eggs, coconut oil, maple syrup, and vanilla.  Add the coconut flour, baking soda, and salt and continue to blend.  Once this is smooth, stir in the shredded coconut.  Grease two 9 inch cake pans with coconut oil and divide the batter between both pans.  You could add parchment paper to the bottom of the pan to make for easy removal, but it's not necessary.  Bake for 30 to 35 minutes or until a toothpick comes out clean.  Cool completely before removing from pans and frosting them.


For the frosting:
16 oz. cream cheese
1/2 cup pure maple syrup
1 Tbsp. vanilla extract
1 cup unsweetened shredded coconut

Let the cream cheese soften to room temperature.  Using a hand mixer, combine the cream cheese, maple syrup and vanilla and blend until smooth.  Stir in the shredded coconut.  You can spread this on the cake right away or refrigerate it for later. 

This makes enough frosting to cover the cake and fill the middle of the two cake layers.  If you want to cut each layer, making this into a four-layer cake, make more frosting.  I also like to sprinkle a little more of the shredded coconut on the top right after I frost it.  Delicious!!


Kale and Ricotta Crustless Quiche


I love a quiche!  The creamy, egg-y-ness is so appealing with all the savory fillings - I'm making my own mouth water just describing it.  At my house, I can get a quiche on the table pretty quickly if I make this crustless.  You could add a whole wheat crust (here's mine), but for speed, I like it without one, and to tell you the truth, I don't even really miss it.  You may feel like it's more of a cross between a quiche and a frittata.  No matter how you think of it, this processed free recipe is delicious.  In fact, my husband raves about this and I pretty much have to plan that he will eat about half of it by himself!

1 Tbsp. coconut oil
2 cups fresh kale, chopped
4 oz. sliced fresh mushrooms (about a half a package)
2 tsp. chopped fresh garlic
3-5 pieces of cooked bacon, crumbled (you can use turkey bacon if you like)
4 eggs, beaten
1 cup whole milk ricotta cheese
2 cups shredded Italian cheese blend (or mozzarella)

Preheat your oven to 350 degrees and lightly grease a 9 inch pie pan with coconut oil.  In a large skillet add the coconut oil, kale, and mushrooms.  Season with a little salt and pepper.  Cook until kale is wilted and mushrooms are softened, then add the garlic and bacon.  Cook for another minute or until the garlic gets a little color.  Remove from the heat. 

In a large bowl, combine the eggs, ricotta and shredded cheese.  Add the kale/mushroom mixture and stir until well mixed.  Pour everything into the pie pan and bake until the eggs are set, about 30 to 35 minutes.  Let cool a few minutes before serving.


Clean Glazed Carrots


My sister insists that if we eat carrots with her, they have to be sweet glazed carrots or she won't eat them.  To try and keep the peace at a large family meal, I decided I could swap out brown sugar with sucanat and pretty much have the same effect in terms of flavor.  And boy are these good!  I like just plain carrots, but these really do disappear quicker at a family gathering than any other way I prepare them.  Here is an easy, processed free version of a decadent side dish.

2 pounds baby carrots (organic if you can get them)
1/4 cup butter
1/4 cup sucanat
1/4 tsp. salt
1/4 tsp. cinnamon
1 Tbsp. orange juice
1/8 tsp. ground white pepper

Place the carrots in a pot and add enough water to cover them.  Bring to a boil then reduce the heat to low and cover.  Cook for 8 to 10 minutes until they are tender.  Drain and set aside.

In the same pot, melt the butter, sucanat, salt, cinnamon, orange juice, and white pepper together until the sucanat and salt have dissolved.  Add the carrots back into the pot, stirring to coat evenly.  Cook for another few minutes in the sauce.  Now it's ready to  serve. 

This is the amount I would make for a large group, but for just my family, I would cut this in half.  Enjoy!

Tuesday, April 2, 2013

Lemon Ricotta Pancakes with Fresh Strawberry Syrup


My friends with lemon trees are giving out lemons by the bag full right now.  I love it because I use lemons in my cooking all the time.  But, one of the best lemon recipes I have, has got to be these lemon ricotta pancakes!  They are amazing, fluffy, and flavorful with an incredible lemon undertone.  I like to pair them with my homemade fresh strawberry syrup for a delicious combo.  This recipe is one of my hero's, Dee McCaffrey - get her book "The Science of Skinny!"  I only made minor changes to it.  Here is clean eating and processed free cooking at it's finest.

Lemon Ricotta Pancakes


1 cup whole wheat flour
2 tsp. baking powder
1/2 tsp. baking soda
1/4 tsp. sea salt
1 cup organic whole-milk ricotta cheese
2 eggs
1 egg white
the zest of two lemons
1/2 cup freshly squeezed lemon juice
1 Tbsp. coconut nectar/honey/maple syrup
1 Tbsp. coconut oil, warmed to a liquid

Whisk together the flour, baking powder, baking soda, and salt in a large bowl.  In a separate bowl, combine the ricotta, eggs, egg white, zest, lemon juice, coconut nectar, and coconut oil.  Fold this wet mixture into the dry ingredients - it will be very thick, but don't over mix.  Spray a pan with coconut oil (I use my misto) and cook several at once - be sure your heat is set to medium low or they might burn before you can flip them.  You will have to spread the batter out a little.  They are thick, so wait until they are no longer glossy on top, then flip.  I like to place my pancakes on a plate that is covered with aluminum foil to keep them all warm until they are ready to serve.  They are fantastic with pure maple syrup, but for an additional treat, try my strawberry syrup.  


 Fresh Strawberry Syrup


1 cup cut-up strawberries (I prefer fresh, but you could use frozen that are thawed)
1/4 cup pure maple syrup
1/2-1 tsp. fresh squeezed lemon juice

Place everything in a food processor or blender and puree until smooth.  My mini food processor is perfect for this.  Not only is this great over pancakes, but use is as a topping for ice cream, cheesecake, waffles, french toast, anything chocolate, etc.

My husband and I literally fight over who gets the last pancake, and if I could get away with it, I would probably lick my plate clean from the strawberry syrup.  Give this recipe a try - I know you won't be disappointed.  My final thought... this would probably be just as amazing made with Meyer lemons - something to try next time!

Clean Vanilla Extract


Did you know that most vanilla extracts on the market have sugar in them!  I didn't until I started going processed free and now read EVERY label of the food I buy.  Why wasn't I reading more labels before?  It just goes to show you that on the whole we have no idea what we are putting in our bodies until we increase our awareness.  Because of this, I now look for pure vanilla extract that has NO sugar added.  I also try to get organic whenever possible too.  This is a brand that I like and can buy locally, but there are other brands out there with no sugar added as well.  In addition to cutting out sugar, I think pure vanilla makes your recipes taste better anyway.  It's a win-win.  Next time you run out of vanilla and need to buy more, purchase a better quality product and cut out the hidden sugar!

Monday, April 1, 2013

Easy Asian

 
I really like Asian inspired dishes, but sometimes they are a lot of work or they don't taste like what you had at the restaurant.  I really like this dish because it's super easy and has all the classic flavors I want that even my kids will eat.  Sometimes, foreign cuisine is the easiest to make processed free and I promise this will be a dinner you can get on the table in minutes, so don't order take out!

3 Tbsp. water
3 Tbsp. low sodium soy sauce
1 large chicken breast, cut into bite-sized pieces
3/4 tsp. sesame oil
3 cups cooked brown rice
1 - 2 Tbsp. rice vinegar
2 1/2 cups coleslaw mix (just shredded cabbage and carrots - I buy mine right at the regular grocery store)
1/2 cup chopped fresh cilantro
1 Tbsp. toasted sesame seeds

Combine the water and soy sauce in a medium pan and heat then add the chicken.  Cover the pan and cook for 4 to 5 minutes.  Turn off the heat and add the sesame oil.  In a separate bowl, combine the cooked rice, vinegar, coleslaw mix, cilantro, and sesame seeds.  Add the chicken with the sauce from the pan - you can add all the sauce or just as much as you like.  Stir everything together and serve.

You can have some optional lime wedges to squirt on top for those who would like that too.  I have to admit, this is pretty good cold as well.  I told you - easy Asian!

Friday, March 29, 2013

More Snack Ideas

 
I've recently talked with some friends about what they wanted to see on my blog.  Almost everyone has asked for more quick, easy, on-the-go type snacks for themselves and more importantly their kids. I totally understand the need for something you can throw in your purse or diaper bag when you are flying out the door - this seems to be a common scenario at our house too.  Here are a few more ideas in addition to my previous snack post. 

 
My friend Ashley reminded me about Lara bars recently.  I love all their flavors and so do my kids.  They are all natural with fruit and nuts - no flour, sugar, or additives.  There are a few that do add chocolate chips, which has the tiniest amount of sugar, but I still think these are overall an okay choice because it's so minimal. 
 

One of my favorite places to shop has got to be Costco.  I can buy all kinds of great things there and snack items are no exception.  I buy these freeze dried fruit pouches in a huge box with lots of variety, like apples, bananas, strawberries, mangoes, pears, and cinnamon apples.  They have no added sugar and are easy to throw in lunch boxes or in your bag for a snack.  I also like to take some of these and cut them up to add to homemade granola - yum!

 
Another great Costco find are these all natural fruit leathers.  Talk about portable, they come individually wrapped and are so thin they can fit in any bag no matter how full.  Again, they are all fruit with no added refined sugar - can't beat that for kid pleasing and guilt free. 

 
My local Trader Joe's has these little cuties all portioned and prepackaged which makes them perfect for on-the-go.  I love nuts and all their health benefits.  My kids really enjoy these cashews and the almond variety too.  If you don't have a Trader Joe's, no problem - just buy raw nuts and portion them out into individual snack sized bags that are ready to grab anytime.  You could even do this with a nut medley too.  So good!

 
I really haven't wanted my kids to feel deprived and have to say to people "I'm not allowed to have that."  I want them to feel like regular kids, just more well informed, and as they get older I hope they will make the best food choices on their own.  However, not feeling different comes with finding good swaps for classic kids snacks, hence the juice box.  My kids flip for a juice box - really I don't see the incredible appeal, but for a special outing, I let them take a juice box with them.  I like these two brands in particular because they have no added sugar - a must if you are going to even buy juice boxes in the first place.  Another thing I like about them is they are super small and my kids already know that once they are finished, they can have either water or milk after that. 

I hope this helps to add a few more ideas to stock your pantry when you don't have a lot of time and also don't want to opt for something overly processed. 

Wednesday, March 20, 2013

Clean Chocolate Cake


This happens to be my favorite chocolate cake!  It has a very surprising ingredient and if you didn't know what it was, you would probably never guess.  This is a flourless cake, but has the consistency of a traditional fluffy crumb and is super moist due to ... black beans.  What?  I know, it sounds crazy, but this is a great swap for refined white flour in chocolate cakes and brownies.  You can use a can of unseasoned black beans (drained, rinsed, and pureed) for every cup of flour.  I found a similar recipe at LowCarbFriends and tweaked it to make it processed free for my family.  Trust me when I say you will never know the flour is gone - you won't miss it!

1 (15oz.) can unseasoned black beans
5 eggs
1 Tbsp. pure vanilla extract
1/2 tsp. salt
6 Tbsp. unsalted organic butter or coconut oil
1 to 1 1/4 cups sucanat or coconut sugar
6 Tbsp. unsweetened cocoa powder
1 tsp. baking powder
1/2 tsp. baking soda
1 Tbsp. water

Mint Chocolate version: 2 tsp. pure mint extract in place of the vanilla

Preheat oven to 325 degrees.  Grease a 9 inch round cake pan or an 8X8 inch pan with coconut oil.  Drain, rinse, and puree the black beans in a blender.  Add 3 of the eggs, vanilla, and salt and blend until everything is completely liquefied - no bean lumps.  In a separate bowl, mix the the cocoa powder, baking soda, and baking powder and set aside.  In a larger bowl, beat the butter/coconut oil with the sucanat/coconut sugar until well incorporated and fluffy.  Add the remaining 2 eggs beating each one at a time.  Add the bean mixture and beat together.  Finally, add the cocoa powder mix and water and beat on high for another minute until smooth.  Scrape batter into the pan and smooth out the top.  Bake for 40-45 minutes.  Cake will be done when it is firm to the touch.  Let the cake cool completely and then cover with plastic wrap.  If you want turn it out, wait 10 minutes after you take it out then flip it out onto a cooling rack.  For the best flavor, make this cake in the morning or let it sit overnight - it won't have even a hint of beans.  You can cut and stack this cake or make these into cupcakes instead.  Store leftovers in the refrigerator.

I purposely showed this without frosting because there are so many options.  I like a clean cream cheese, a clean chocolate, a clean version of a ganache or even an avocado frosting (I'm working on that recipe right now - it's almost perfected and ready to post.)  So frost how you want or eat as is with a scoop of clean ice cream (recipe here.)  I hope you love it as much as me and my family.


For cupcakes, fill these pretty full as they won't rise much.  You'll probably get anywhere between 15 to 18 cupcakes.  Bake for about 20 minutes.  You can also try using a hotter oven temperature and baking them for less time.  In theory, this should help them rise a bit more.

Tuesday, March 19, 2013

Better Broth


Many recipes call for chicken broth.  I really like to make my own and have it on hand in the freezer.  I pour it into ice cube trays that hold 2 Tbsp. each and then it is really easy to convert it for recipes, for example 2 cubes equals 1/4 cup.  But, if I run out and need chicken broth and don't have time to make my own, I really like this Imagine brand chicken broth.  They have stocks and broths that are regular or low sodium and made with organic ingredients.  It also boast that it's preservative free, has no MSG, not artificial ingredients and is cooked with meat from free range chickens.  Not bad for a packaged item.  This is my choice if I don't have homemade broth to cook with.  Give it a try.

Pumpkin Spinach and Chicken Sausage Pasta

 
I was waiting to get my haircut by my sister at her salon, and I happened upon a recipe in a magazine that incorporated pumpkin and spinach in a pasta dish.  I'm always looking to increase our veggie intake at every meal, so I took the overall idea and made it into a processed free pasta dish that is creamy and delicious.  You could easily make this vegetarian too just by eliminating the sausage.  Let's here it for the power of pumpkin!
 
2 cups (6 oz.) whole wheat pasta (ziti, rigatoni, penne, etc.)
1/2 a can of pure pumpkin (not pumpkin pie filling - should have no sugar!)
1 Tbsp. whole wheat flour
1/2 tsp. garlic powder or 1-2 cloves of fresh garlic, minced
1/4 tsp. salt
1/8 tsp. ground nutmeg
3/4 cup water
2/3 cup dry milk
2 fully cooked Italian-seasoned chicken sausage cut into 1/4 inch slices
2-3 cup baby spinach
1/2 cup shredded mozzarella cheese
1/4 cup shredded Parmesan cheese (real, not the green can)
 
Preheat your oven to 425 degrees and grease a 2 quart baking dish with coconut oil.  Prepare your pasta to just slightly aldente (undercooked) and remember to add some salt to the water right before you add the pasta.  Reserve 1/4 cup of the pasta water and after the pasta is drained, return it to the cooking pot. 
 
Combine the pumpkin, flour, garlic powder, salt, and nutmeg in a skillet over medium heat.  In a separate container mix the water and dry milk until it's smooth.  Add 3/4 cup of this mixture and discard the rest (sorry about the waste of those 2 oz.) and slowly stir this into the pumpkin mixture until it has thickened and is smooth.  Combine this with the pasta, pasta water, and sliced sausage.  Spread half of this into your baking dish and top it with the spinach.  Add the remaining half of the pasta.  Place a piece of foil loosely on top and bake for 20 minutes.  Combine the mozzarella and Parmesan in a bowl and after the 20 minutes are up, remove the foil and sprinkle this on top.  Bake for another 5 minutes uncovered or until the cheese is melted.


This was creamy without any cream and full of veggies and whole grains.  My kids love pasta, so this recipe did double duty as a noodle dish and vegetable delivery system.  Score as a mom!

Wednesday, March 13, 2013

Lunch Meat


I've been on the search for a better kind of lunch meat.  Now, I have to admit, my very favorite in terms of being processed free is Applegate Farms brand, but they are a little hard to find and kind of pricey.  My second choice is this Hormel Natural Choice.  I can find it in the regular grocery store and it boasts that it has no nitrates or nitrites, no artificial ingredients, no MSG, no preservatives, the meat is raised without added hormones, and it's gluten free.  That is a whole lot better than most brands on the market.  If you can find and afford Applegate Farms then do it.  Otherwise, this is not a bad alternative.  

Saturday, March 9, 2013

Vanilla Cinnamon Grapefruit Soda


My sister received a gift card to the restaurant True Foods and invited my mom and I to have lunch with her.  Their food is more healthy/natural with real ingredients made fresh.  While we were there we ordered this house-made grapefruit soda.  It was really refreshing and I couldn't get it out of my head even days later.  So, I decided to try and recreate it on my own.  Soda is not something I really drink anymore since going processed free, but making one at home is not that hard and I can control the sweetener.  What I liked about the one at the restaurant its that it had no added sugar.  How's that for a great soda alternative!  I'm sure that if anyone actually knows how they make it at True Foods they would say I'm doing it wrong, but I still like the result I got.  Here's what you need.

1 grapefruit (the more pink/red the better because they are naturally a little sweeter) I prefer Texas Red
cinnamon
pure vanilla extract
liquid vanilla stevia
sparkling water (this is not straight seltzer or mineral water - the ingredients should just say "carbonated water")


In a small sauce pan, add the juice and pulp from the grapefruit.  If you have a really large, juicy grapefruit then add anywhere from 3/4 tsp. to 1 tsp. of cinnamon.  If it's not that big or doesn't seem like that much juice, add only a 1/2 tsp.  Set this on the stove and bring to a boil.


After a minute it will really bubble and you'll have to stir it constantly for about 5 to 7 minutes.  You are wanting to reduce the liquid by half to concentrate the grapefruit flavor and infuse it with the cinnamon.

You'll know to turn off the heat when it looks like it's only half of what it used to be.  Here's what it looks like after being cooked down.


Now, you will pour the liquid through a strainer to remove the pulp.  I like to strain in into a measuring cup to see how much I've ended up with.  If it's around 1/4 cup, I add 1/2 tsp. of vanilla.  If it's more than that, I will add anywhere between 3/4 to 1 tsp. of vanilla.  The last time I made this I ended up with 1/2 cup of the strained liquid - it was a big, beautiful, juicy grapefruit, so it required more cinnamon and vanilla - about 1 tsp. of each.  Oh, and by the way, don't throw away the pulp - it's delicious.  I like to put the cinnamon grapefruit pulp spooned over some of my clean vanilla ice cream recipe - it is so good!


Once you've added the vanilla to the cinnamon and grapefruit mixture, you are done making your syrup.  Easy, right?  Refrigerate it for a few minutes to cool it down.  Now you are going to make your soda.  This all has to do with your own personal tastes, but here are the general ratios I use for mixing - add more or less of anything you want.  For every cup (8 oz.) of sparkling water, I add 2 to 3 tsp. of the syrup.  You can drink it this way, but I prefer it with anywhere from 2 to 4 drops of vanilla stevia per cup as well.  My husband and kids like a few more drops of stevia than that, so it's all about personal taste.  I like to have the sparkling water already chilled because the ice melts too quickly otherwise and waters it down too much. You can always add more of the syrup if this happens.  I hope you try this and like it - I really do!