Thursday, January 31, 2013

Homemade Pasta Sauce


Have you ever wondered why the tomato sauce at an Italian restaurant is better than what you buy in a can or jar from the store?  If you have an Italian mama, like I do, you already know the answer.  You have to make it from scratch with quality ingredients!  And authentic pasta sauce is one that is fresh, not heavy with pasta swimming in it.  Now, don't be scared off by the idea of making it yourself - it's super easy and takes the same amount of time to cook the pasta from start to finish, making this an incredibly fast dinner for any night of the week.  This is my go-to recipe when I don't have a lot of time or I haven't gone to the store.  You will be amazed at the difference in taste and never want for anything but this processed free version ever again.  


1-2 cans of whole or diced peeled tomatoes (use 2 cans for every pound of pasta)
2-3 cloves of minced garlic depending on how much you like (or use garlic powder if you don't have any on hand)
freshly grated Parmesan cheese (I always have a block in my refrigerator)
salt
Italian seasoning/dried basil/dried oregano
coconut oil
olive oil

optional: fresh basil leaves torn or cut to add at the end

I have made it without the basil and it's still delicious, but the fresh basil always feels like the ultimate finishing touch in presentation and flavor.


Put on a pot of water to boil your pasta.  I use whole wheat or brown rice noodles.  I have heard good things about quinoa and artichoke pasta too, but I haven't tried them yet.  You can also use any kind of noodle too... spaghetti, penne, rigatoni, etc.  Don't forget to get out the sea salt and salt your boiling water right before the noodles go in.

In a skillet on medium heat, put about 2 Tbsp. of coconut oil and saute the garlic for a quick minute - don't let it burn!  Just get it to a golden color then pour in your can of tomatoes.  (My mother-in-law sends me home-canned tomatoes from her garden, and I have to admit, these are my favorite to use.)  Start to break up the tomatoes as you stir everything together.  Add salt to your tastes and sprinkle in any other kind of seasoning that you like - I gave you some ideas up above.  You want to cook out the water from the tomatoes, but not exactly boil it out, just a light bubble.  The tomatoes will continue to cook down and break apart as the water evaporates.  This all happens while your pasta water is heating then cooking your noodles - isn't that great!  When you pasta is almost ready and most of the water has evaporated from the sauce, grate in some fresh Parmesan cheese - no green can!  I like to use my microplane to get it really fine.  Add as much or as little as you want and stir it into the sauce - it will dissolve and not be visible. Then turn off the heat and add some finely chopped basil and a drizzle of olive oil.  In the picture below, I only used one can of diced tomatoes because I only cooked a half pound of pasta, but you can see how thick it turns out.


When the pasta is drained, I put it back in the pot it was cooked in and pour the sauce over the top to toss them together. When this is served, don't forget to add a few more grates of Parmesan to the top.  I promise you will love the fresh flavor and the speed at which this comes together for any night of the week!

Saturday, January 26, 2013

Almond Spread


I made my fruit and veggie muffins (recipe here) and wanted to try a new nut spread that I found on pinterest.  It's a vegan recipe, and although I'm not vegan, I liked the idea of incorporating more healthy nuts into our diets - and it is processed free.  On her site, she calls this almond cream cheese, and while I really liked this spread, I wouldn't go as far as calling it cream cheese myself.  But, dipping veggies or spreading this on bread was yummy!
 
1 cup raw almonds
1/3 cup water
1/2 tsp. sea salt
1 tsp. apple cider vinegar (I like Braggs)
1 tsp. lemon juice


Soak the almonds in water for 8 hours or overnight.  Rinse and drain them.  Remove the skins by pinching the almonds between your fingers - they pop right off.  My daughter had so much fun with this part.


Then, in a food processor or good blender add the almonds, water, salt, vinegar and lemon juice.  My mini food processor was the perfect size.  Blend until smooth.


That's your spread!  It came together pretty quickly once the almonds had soaked.  On the woman's site where I originally got this, she tells how to make this into a frosting.  I didn't really care for it sweetened as much as just a spread, but if you think that would appeal, go for it.


Healthy Fruit and Veggie Muffins


I'm pregnant again with our third, and eating processed free couldn't be more important than right now!  So, as I was flipping through my copy of What to Expect When You're Expecting again, I found a gingerbread carrot muffin recipe that looked pretty good.  For the most part it was already pretty clean - I only had to make a few swaps to completely make these processed free.  The original recipe called for dried apricots, which I did use, but I think these would taste great to substitute blueberries, unsweetened dried cranberries, dates or some other fruit.  This recipe makes 12 muffins.

1 cup whole wheat flour
1/4 cup ground flaxseed (flaxseed meal) or wheat germ
1/4 cup old-fashioned rolled oats
2 tsp. ground ginger
1 tsp. ground cinnamon
1/2 tsp. ground cloves
2 tsp. baking soda
2/3 cup finely chopped dried apricots
1/2 cup chopped walnuts or pecans
1 cup white grape juice concentrate
2 large eggs, lightly beaten
1/4 cup coconut oil
1 tsp. vanilla extract
2 tsp. minced peeled fresh ginger
1 cup grated carrots

Preheat the oven to 375 degrees.  Line a 12-cup muffin tin with paper liners.  In a bowl, mix the whole wheat flour, flaxseed, oats, ginger, cinnamon, cloves, and baking powder.  Then add the apricots and nuts.

In a separate bowl, whisk the juice, eggs, oil, vanilla, and fresh ginger.  Add this mixture to the previous one and stir until it is well blended, but not over mixed.  Fold in the carrots and evenly spoon the batter into the muffins liners.  Bake them for about 20 minutes or until a toothpick comes out cleanly.  Transfer them to a wire rack to cool and either store them in an air-tight container for 3 days or freeze them for about a month. 

I love that these have whole grains, fruits, veggies, and no refined oils or sugars - a home run for the kids!

Monday, January 21, 2013

Breakfast Fried Rice


Do you ever wonder what to do with leftover brown rice, especially when you don't have much of it anyway?  I like to use it the next morning to make breakfast fried rice!  I love this so much, that I intentionally will set aside some brown rice from our dinner to use the next morning because this is so good.  And what's great is that you don't need very much rice.  If you are just making a single serving, you need anywhere from a 1/4 to 1/2 cup - that's it.  This is another one of my favorite, flexible, and quick recipes that leaves you smiling and happy you are processed free!

Single Serving:
1 egg
leftover brown rice
baby spinach (a handful, torn)
1 clove garlic, minced (or a few dashes of garlic powder)
onion powder
any leftover veggies, diced
Parmesan cheese
salt and pepper to taste

In a skillet on medium heat, saute your baby spinach leaves, garlic clove (or garlic powder,) onion powder, and leftover veggies for a couple of minutes until they are soft and the spinach is wilted.  I use coconut oil for sauteing and your veggies could include: bell peppers, carrots, peas, potatoes, sweet potatoes, zucchini, diced tomatoes, olives, etc. - anything really!  Next, add your leftover brown rice and stir for a minute to warm through and combine with the veggies.  Then push everything in the skillet to the outside edges, forming a donut shape with the veggies and rice.  In the center that is now clear, crack your egg and begin to swirl it around with a heat-resistant spatula to form a scrambled egg effect, but as you are swirling, slowly start to draw in the contents from the outer circle of food.  This creates those small bits of egg throughout the dish that are just like fried rice.  Once everything is stirred together, add as much or as little freshly grated Parmesan cheese as you like.  This cheese is a little salty in taste, so you may want to use less salt when you season it while it's cooking.  That's all there is to it.

 This takes me only minutes to make because it's almost entirely made of leftovers, but so healthy and delicious.  Even if I only have leftover rice, I always have baby spinach in my freezer that I have previously frozen by putting handfuls of baby spinach in a gallon freezer zip-top bag, then squeezed the air out.  I have this on hand when I make green smoothies or I'm going to cook some fresh spinach for something.  I want to explain that this spinach would not make a nice salad after being frozen, but it's perfect for smoothies and cooking!  This way, I always have it on hand, and my fresh baby spinach is never thrown away because I didn't use it in time.  The breakfast fried rice tastes just as good even without the other veggies.

Thursday, January 17, 2013

Vanilla Ice Cream Made Cleaner


I love ice cream and so does my family.  If my kids had their way, we would eat ice cream everyday!  Good thing they are not in charge of our diets.  I did however, want to be able to still give them ice cream once in a while, after all you have to enjoy life and childhood, but I hated feeling so bad about all the refined sugar and artificial colors.  I also wanted a recipe that didn't involve cooking and cooling - that would take too much time for the kids to be satisfied making it at home or planning too far ahead that we might not actually do it.  This is what inspired my vanilla ice cream recipe that is easy, in the machine in minutes, and processed free.

1 1/2 cups whole milk
1 1/8 cups sucanat (find out more about this here)
3 cups heavy cream
1 1/2 Tblsp. pure vanilla extract

In a bowl, combine the milk and sucanat and mix with a hand mixer on low until the sucanat is dissolved, about 1-2 minutes.  Add the cream and vanilla and mix another few seconds to incorporate everything.  The base is now ready! 

Follow the directions for your ice cream maker.  Mine is a cuisinart with the metal cylinder that you keep in the freezer until you are ready to make ice cream.


I insert the cold cylinder, turn on the machine and pour in the ice cream base and let it mix until it thickens.  This takes about 25 to 30 minutes.  When it's done, it will be a soft, creamy consistency.  If you want it to be firmer, put the ice cream in an airtight container and place it in the freezer for 2 hours or more.  This will make plenty of ice cream to last for a few treat-time events, about fourteen 1/2 cup servings.  When I get it out of the freezer, I usually put it in the microwave for 10-15 seconds to make it scoopable or let it sit out for a few minutes before serving.  

Coffee-Free Mocha Version:
substitute the sucanat for coconut palm sugar and it will give you a lovely mocha background to the vanilla ice cream without adding coffee! 

I recently had a friend tell me that she wants to go processed free, but doesn't think her husband would go for it.  Her idea was to cook cleaner meals without telling him and see if he notices a difference.  She asked specifically what I do about ice cream since this is one of his favorite treats.  I happened to have some of this on hand and gave her a spoonful to try.  Her eyes instantly lit up and a huge smile spread across her face as she said, "This is amazing!  Better than what you get in the store.  This will definitely go over well!!"  It just goes to show that processed free doesn't mean taste free.  I'll have to share my homemade, processed free chocolate magic shell soon too.

Wednesday, January 16, 2013

Turkey Tacos with Homemade Taco Shells

 
We love tacos at our house and we've been making them with turkey instead of beef for years.  I think they feel even a bit heartier than beef, but if you like ground beef, feel free to make these the same way just swap out the meat.  The best part is, if you make only a few easy swaps this meal becomes processed free and on the table in almost no time.
 
1 package fresh extra lean ground turkey (or beef if you prefer)
corn tortillas
 
toppings that you like: shredded cheese, diced tomatoes, lettuce, olives, avocado, diced bell peppers, taco sauce, salsa, etc.
 
Start browning the meat in a skillet and add seasonings that you like.  I like salt, pepper, and homemade taco seasoning - you've got to make it yourself or it's not processed free.  Here is mine.  Do a quick chop on any toppings that need it. 


Here's the fun part, you are going to make your own taco shells!  I got this from Hungry Girl a few years ago and I love it!  Plus, it saves a lot of fat and calories, and it's super easy and quick.  Preheat the oven to 400 degrees.  Once heated, take a pair of tongs and drape the corn tortillas over two of the rungs in the oven.  Leave them in for about 5 minutes, then take them out and let them cool.  They will be crispy and crunchy; everything you want in a taco shell without the greasy hands.  Now they are ready to fill.
 
For the kids, I usually break them up then toss them with all the fillings to make this more of a taco salad.  It's less messy and scoopable with a fork. 


A small note about the corn tortillas.  I like to buy organic sprouted corn tortillas, but if you can't find them, just buy a package that has only a few ingredients like ground corn, salt and lime.  If you buy regular ones then this is not exactly processed free, so the next time you go to your local health food store, buy some and freeze them until you are ready to make tacos.  


Homemade Taco Seasoning


So, when you look at this long list of ingredients to make a homemade taco seasoning, you might think that it looks similar in length to the pre-packaged version.  But, I promise this is much healthier without the MSG, additives, and preservatives.  I mix this up and only use a little at a time, so it goes a long way.  Now you know everything that went into your seasoned food and can rest assured it's processed free.

2 Tbsp. chili powder
1 tsp. garlic powder
1 tsp. onion powder
1/4 tsp. cayenne
2 tsp. paprika
2 Tbsp. ground cumin
4 tsp. ground coriander
2 tsp. sea salt
2 tsp. dried oregano
1/4 tsp. black pepper
1/4 tsp. dried marjoram
1/2 tsp. red pepper flakes (optional)

Mix everything together and store in a jar or air tight container.  If you like things more spicy, double the chili powder and maybe even the red pepper flakes.  I can tell you my husband would love that, but I have to make this not too spicy for the kids. 

Healthy Hot Chocolate with Coconut Whipped Cream


My daughter loves to have what we call a "mommy sleepover" when my husband is out of town.  We stay up later than her usual bed time and do something fun like paint pictures, watch a movie or play games.  Then we cuddle up on my bed with a cup of hot chocolate before we go to sleep.  I must admit, that when we do this, she absolutely expects the hot chocolate or the night would end in tears.  This was a challenge when we decided to go processed free because I didn't want to disappoint her, but I also didn't want her to have all that processed sugar in her system either, not to mention whatever else was added.  I set out to find a substitute, but all the recipes I tried were never quite what I wanted.  I found that I needed to take a little of each of them and come up with my own. 

1 cup almond milk
1/2 Tbsp. unsweetened cocoa powder
1 Tbsp. pure maple syrup
1/2 tsp. vanilla

You can also add 1/4 tsp. of cinnamon and 1/4 tsp. of cardamom for a more sophisticated hot chocolate.  It has a great taste, but just a little bit of texture.

Heat the almond milk then add the remaining ingredients.  Then, you have one of two options.  Either put it in the blender for a few seconds, but be careful as steam will rise.  Or you can do what I prefer and use an immersion blender which I think is easier, faster, no worries about steam, and quick clean up.

Coconut Whipped Cream


1 can coconut milk (put in the refrigerator for at least a few hours, overnight is better)
a wholesome sweetener of your choice - sucanat, coconut sugar, stevia, erythritol, etc.

Open the can of coconut milk very carefully, you don't want to shake it!  Scrape off all the solidified coconut cream that has risen to the top and put it in a bowl.  You won't use the liquid underneath.  Beat the cream a little then add some sweetener to your taste, that's it! 

I wanted to explain just why this hot chocolate is so much healthier.  Of course taking out the refined sugar speaks for itself, but unsweetened chocolate is extremely healthy in small amounts.  There are all kinds of health benefits that I will explain sometime in more detail, but all of these are negated when sugar and dairy is added.  By using a nut milk as the base, replacing the sugar, and using coconut whipped cream, you have done all the right things to reap the benefits of this super food - and your end result was tasty too!  

Tuesday, January 15, 2013

Whole Wheat Biscuits


Do you want biscuits that are healthy and tasty too?  No way... just kidding, yes I do!  How about fast and easy too?  Sign me up.  Here is my processed free and fast version of biscuits.  It uses my homemade baking mix again and can be made in two different ways depending on the end result you want. 

2 1/4 cups whole wheat baking mix (found here)
2/3 cup milk

Preheat oven to 450 degrees.  Mix ingredients and roll out to about a 1/2 inch thickness.  I like to roll them out on wax paper that I wet on one side to keep it from sliding on the counter, then sprinkle some whole wheat flour down and some on the top to keep it from sticking to the paper or your rolling pin.  Cut out with a round biscuit cutter or upside down water glass.  Place them on a silpat or lightly greased cookie sheet and bake for 8 to 10 minutes.  This will make 8 to 10 biscuits depending on the size you cut out.

You can make these even easier by skipping the roll and cut out steps, and dropping them by spoonfuls onto the cookie sheet to make them drop biscuits. 

Easy enough for any night of the week and much healthier than the store bought tube kind.  It's good to have nourishing food that is as homey as biscuits!

Yummy Whole Wheat Pancakes


My kids love to make pancakes on the weekends with their dad.  This was a tradition in his house growing up and something we had to continue with our children.  We used to buy just boxed pancake mixes, partly because they were easy and convenient and partly because this is how my husband cooks.  So, I wanted to give him something that was still as easy as a box mix, but much healthier!  At first, I tried to find a store bought version that was processed free and when that failed, I started making my own mix.  I keep it in the freezer so we always have it on hand.  Here is how to use it to make yummy, healthy breakfast.  Let the weekend pancakes begin!

2 cups whole wheat baking mix (found here)
1 cup milk
2 eggs

Mix everything together and make the pancakes as usual.  These taste amazing and are great to freeze for quick pancakes any morning.  Top with real maple syrup, berries with homemade whipped cream, etc.  Easy, delicious, and processed free!

Saturday, January 12, 2013

Whole Wheat Crepes


Don't crepes just seem so fancy!  I was lucky enough to grow up eating crepes as a standard in our breakfast rotation.  Yes, my mom can cook!  And when I was younger, I had the opportunity to live in Europe for a while where there are always little crepe stands that make them fresh right in front of you then slather it with yumminess like nutella or powdered sugar.  Okay, nothing about this sounds processed free, but I'm getting there.  First, let me tell you how easy these are to make.  If you have a whisk and a pan, you can make crepes.  Secondly, you can have your cake and eat it too (or crepes rather) if you swap out only a few ingredients to make this guilt free.

3/4 cup whole wheat pastry flour
1 cup milk
2 eggs
1/4 tsp. salt

Beat all the ingredients together and try and remove as many lumps as you can - ideally there would be no lumps, but don't worry if there are a few.  Spray a cooking pan with coconut oil (I use my misto - read about it here) and pour in some batter right in the middle.


Then, lift the pan off the burner and swirl it around until it becomes a larger, flatter circle.  You can see the difference in these two pictures.  I usually pour in a bit more batter than the picture shows to be able to swirl it and coat the entire bottom of the pan, but these were for my kids, so I made them a little smaller.  When it is no longer glossy or only a little in the center, flip it gently with a spatula.


You'll see the edges start to curl up when it's done.  Transfer it to a plate and cover the stack with a clean kitchen towel or tin foil to keep them warm. 


And here is the best part - filling them and devouring!  Some of my favorite fillings include:
  • berries and banana slices with homemade whipped cream (cream with sucanat/coconut sugar/eryithritol/stevia)
  • butter with homemade powdered sugar (recipe here) and fresh squeezed lemon wedges
  • homemade nutella (I'll post my recipe some time) with a sprinkle of nuts
  • fruit or all fruit preserves with cream cheese or ricotta cheese
  • maple syrup (the kids like this for sweetness)
  • homemade chocolate sauce (so it is processed free) with berries
And since this recipe doesn't call for sugar of any kind, you can also use them for savory crepes in which the filling possibilities are endless too.  Here are a few ideas:
  • scrambled eggs with meat, cheese, and sauteed veggies
  • asparagus, ham, and Gruyere/goat cheese/Swiss
  • chicken in a cream sauce
  • shrimp/chicken/salmon with sauteed veggies, garlic, capers and lemon
  • sandwich-type fillings with spinach
  • sausage, sauteed apple and Gruyere
These are just the tip of the iceberg for filling possibilities.  But, now you know you can make them processed free and from scratch yourself.  Go ahead and let everyone be impressed!


Healthy Homemade Powdered Sugar


Many of my past favorite recipes have used powdered sugar in some way for sweetness, and until I could find an acceptable alternative, these recipes where on the shelf.  But, not any more!  Here is a processed free, healthier version of this pantry staple.  You could actually make regular powdered sugar the same way, but we are of course not doing that. 


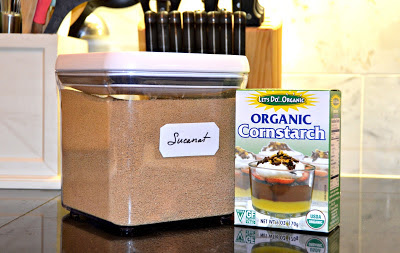
1 cup sucanat (or palm sugar or erythritol)
1 Tbsp. cornstarch or arrowroot

Put both ingredients in a food processor and pulse until everything is combined and very fine in texture. 


This is what mine looked like in my mini food processor.  Because the sucanat is brown, the powdered sugar is a light brown too.  If this throws you off, use the erythritol because it is white.  I personally like the whole food-ness of the sucanat or the palm sugar, so the brown shade of those doesn't really bother me.  I guess it may depend on what you are using it for.  I also prefer the cornstarch to the arrowroot, but you could use either.  I do however use organic cornstarch since corn is a highly genetically modified food (GMO) and I want to stay away from that as much as possible.  If you use the sucanat version for an icing or glaze where it's just milk and vanilla added, your glaze will be brown and have a little bit of a molasses flavor to it.  My kids absolutely love it!  One final note, if you use coconut/palm sugar or erythritol you may need to use a little more to achieve the same sweetness you want in your recipes.  I hope you like using a healthy powdered sugar.  Have fun with this! 

Sucanat


I have mentioned in some recipes that I use sucanat in place of refined white sugar.  I thought I should explain what it is and how to use it.  Sucanat stands for sugar cane natural - it is organic whole cane sugar.  Yes, it's sugar, but it is not processed the same way white sugar is.  This kind of sugar is dehydrated at low heat and contains the molasses still in the original cane juice.  The molasses is where many of the nutrients from the original cane juice are found, and what your body needs to properly digest sugar.  This is why it is brown.  You may wonder if brown sugar that has molasses added to make it that way is just as healthy as whole cane sugar, and it's not.  They add such a small amount of molasses that has been heated to kill most of the nutrients anyway that it is definitely not the same! 

You can find packages of sucanat in some health food stores or in their bulk food sections.  You can also buy it online, but make sure it is called sucanat, rapadura or organic whole cane sugar.  Use it cup for cup in your recipes that call for sugar.  The only noticeable difference is the color.  It may make some recipes look just slightly different if they are a light color, but for most, it won't matter.

This brings me to another point, there are several terms on the market that might make you think you are buying something healthy or the same as sucanat when they are really not.  Beware of "evaporated cane juice/sugar" or sugar in the raw.  These are almost identical to refined white sugar and NOT what you want to put in your body if you are trying to be processed free.

Thursday, January 10, 2013

Whole Wheat Bread and Honey Butter


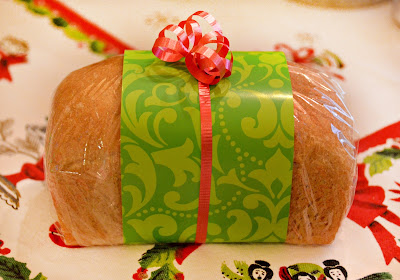
This is the duo that I gave away to friends and family at Christmas - a yummy treat that still remained healthy.  I made mini loaves which are pictured, but I will give all the details for the regular size.  Since going processed free, I actually buy most of my bread from the store in the health food section.  I've shared before that I like the sprouted wheat Ezekiel bread which has met pretty much all my daily needs.  But, there is something about homemade bread - the smell in the house, the warm slice in your hands that just cannot be duplicated by anything made in a factory.  My friend Karen shared this recipe with me and I have made only minor adjustments to make it processed free.


6 cups warm water
2/3 cups coconut oil
2/3 cups raw honey
2 Tbsp. salt
6 cups whole wheat flour
2 Tbsp. yeast, heaping (I like SAF or Rapunzel)

7-8 more cups of whole wheat flour

Pour the warm (not hot) water in your mixer.  Add the oil and the honey.  If you use the same measuring cup the honey will just slip right out after the oil.  Add the salt, 6 cups of flour, and yeast in that order.  Mix this together first, then slowly start to add the rest of the flour while it is still mixing until the dough starts to clean the sides of the bowl.  It will take around the 7 or 8 cups called for, but don't add too much.  You want the dough to be slightly sticky, but not gooey.  And don't worry, this recipe seems to be very forgiving.  While the dough continues to knead for a few minutes, grease four large bread pans with coconut oil (I used my Misto to do this - love it!)  Dump the dough out onto an oiled counter top and divide it into four equal parts.  Shape the loaves and place them in the pans.  Put the pans in a warm area covered with plastic wrap or a kitchen towel and let them rise until they have about doubled in size - maybe about an inch taller than the edge of the pan.  Bake at 350 degrees for 25 to 30 minutes.  When they are nice and golden, remove them immediately from the pans and allow them to cook on a wire rack or towel.  You can butter the tops while they are still warm if you want, but I rarely do. 

If you want to make the mini loaves, follow the directions up to the point where you divide them up.  I have found that I can get about 15 mini loaves from this recipe.  You still need to let them rise, but only bake them for about 18 minutes at the same temperature. 

Regardless of the size, these freeze beautifully, so even though this makes quite a bit, you won't be sorry to have some on hand.  And they do make great gifts.

Now I have found that you shouldn't let one of them cool entirely before cutting into it and slathering it with butter - it loses something not to eat it warm, right?  So enjoy the fruits of your labor at that perfect moment when all feels right in the world.


As for the honey butter, it is beyond easy to make.  It's just salted butter (I like organic) softened to room temperature then beaten with as much or as little raw honey as you want.   Make this to your personal taste.  I personally enjoy having to spread a little on a piece of warm bread for a taste check many times over!

Misto Cooking Sprayers


Here is one of my new favorite finds - the Misto!  While trying to go processed free, I have found that not only some products that I used in the past made cooking faster, but easier too.  This was the case for cooking sprays.  Even if I chose to use the olive oil spray (which is not healthy when consumed at high heat anyway,) the added chemicals used to propel it were not what I wanted in my body.  I knew that some pump products existed where you use your regular oil, but I had never come across them in a store.  Then my mom found these while shopping at Costco and knew we needed them.


They came two in a package which was perfect because I wanted one for olive oil and one for coconut oil.  And they are so easy to use. 


Here is what you do: pour your oil in the bottle and fill it to the top of the window, screw the cap back on, and use the lid to pump air into the chamber.  Now you can create a nice even spray without all the chemicals, and better yet, you still have a cooking spray that is fast and easy.  How great is that?  You will have to pump it a few times between uses, but I don't think that is a bad trade off. 

Now here is the only special instruction needed regarding the coconut oil.  Since this kind of oil is solid at room temperature, it does need to be heated to pour it in the bottle and spray it, so I heated it to do just that which was fine while I was using it - it stayed liquid long enough.  Once it got put back on the shelf for a while it turned solid inside the Misto again.  I found that if I just ran warm water over the filled bottle for about three minutes it became liquid again and I could use it as I did before.  I also figured out I could put the bottle in a bowl of warm water and by the time I was ready to use it, it was liquid again.

So let's here it for the Misto!  Go get one, you'll feel so great getting rid of your store bought sprays and feeding your family only what you intended. 

Monday, January 7, 2013

Chicken Pot Pie


Who can resist a nice, hearty slice of chicken pot pie?  And what if I tell you it's processed free, so your body will recognize and be nourished by all the ingredients.  Even better, right?  To top it off, it's an easy, flexible recipe that is family friendly - even my picky, non-vegetable loving kids like it.  So, here is my version of chicken pot pie without a lot of fuss or chemical additives.

1 recipe for whole wheat pie crust (can be made ahead of time)
1 Tbsp. butter
3 Tbsp. whole wheat pastry flour
1/2 cup chicken broth
1/2 cup milk
onion powder
dried basil
dried thyme
garlic powder
vegetables
cooked chicken

Make the pie crusts - you will need a top and bottom and this recipe will give you that.  Set them aside in the refrigerator for later. 

Here is where the flexibility comes in.  You want to put your cooked chicken and vegetable medley in a bowl, but use whatever you have on hand.  I typically use a frozen vegetable medley that I've thawed and any other leftover veggies lying around.  My favorites include carrots, peas, potatoes, broccoli, cauliflower, corn, celery and string beans - all of which should be in small pieces.  But, use what you have.  I've even used a canned vegetable medley that is organic with no added extra ingredients, although I prefer the quality to be more fresh cooked or frozen thawed - less mushy.  As for the chicken, use leftovers cut up, a rotisserie chicken cut up, canned or home pressure cooked and canned (my favorite.)  As for the amount of each, you need about a 1-2 large cooked chicken breasts and as much veggies as you think will fly with your family.  I wouldn't use any less than one can or easy steamer bag of veggies.  The nice thing is, if you use less, your pie is a little flatter, and if you use more, your pie is a little more dome shaped on the top - all up to you and your family's taste.

Next you will make the sauce.  In a small sauce pan, melt the butter and then add the flour to make a roux.  Add the broth and milk while you continue to stir to get rid of the lumps. Next, you will add a few spices.  Sprinkle in a little onion powder, garlic powder, dried basil, and thyme - as much or as little as you want, but don't go too overboard.  Bring to a boil and cook until it thickens - this will only take a few minutes.  Once it's done, pour it into the bowl with the chicken and veggies and stir this all together. 

Put one pie crust in the pie pan, pour in your filling, and place the second pie crust on top.  I take the edges of the top crust and fold them down over the edges of the bottom and crimp them together so that no filling will bubble out.  Then, take a knife and make a few vent holes in the top crust - I usually just make an "X" in the center.  To make this really fancy, take one egg, beat it and brush a thin layer all over the top crust.  This helps it look browned and gorgeous after it's baked, but it is absolutely not necessary.  I just like the impressive look it gives.

Bake it in the oven at 400 degrees for 30 to 40 minutes.  It's just the crust that needs to be cooked and brown, so once that looks done, you are finished.  Here's what mine looked like right out of the oven.


The crust will be buttery and flaky, and the inside will be warm and delicious!  Mine is a bit of a thicker consistency, almost quiche-like on the inside because I don't like cutting into something and having the filling all run out.  You can see how it stays together as you cut slices.  The leftovers are also really good the next day.  I serve this with a nice salad.  I hope you love it as much as my family!


Whole Wheat Pie Crust


I had been looking for a whole wheat pie crust recipe for a while that was flaky, tender and most of all delicious.  I learned along the way that most pie crust is pretty easy to make at home instead of buying it at the store and definitely makes this processed free without all the white flour.  However, not all recipes are created equal - some are not as tasty, others are tough, and many are so complicated that you just won't make them ever again.  I found this recipe and it has become my favorite so far.  I figured out how to make it WAY easier and super fast.  But I also included a version you can do by hand that is also simplified.  This will make two pie crusts.

1/4 cup ice water
1 egg
2 cups whole wheat pastry flour
1/2 tsp. salt
12 Tbsp. butter (1 1/2 sticks)

In a food processor, pour in the flour and salt and pulse to mix.  Add the egg, water, and the butter that has been cut in large chunks.  Pulse until it forms a dough ball.  Remove from the food processor and cut into two equal pieces.  Sprinkle some whole wheat pastry flour on the counter and shape one of the halves into a flat disk.  Place it on the floured surface and start rolling it out until it is a thin, sort of circle shape.  You could also try rolling out the dough on wax paper, which is sometimes easier when transferring it to your pie plate.  Place it in the pie place and cut off any extra around the edges.  Make sure you don't stretch it when putting it in.  It's that easy!

By hand:
Take the 1 and 1/2 sticks of butter and cut them length-wise down the middle, then down the middle of each of these pieces.  This will give you 4 long quarters.  Then slice these into small, square pieces.  This is what it will look like.

 
Once you have all the butter cut up, put them in a bowl and stick it in the freezer until you're ready to use it. 

Whisk together the flour and salt.  Measure out a 1/4 cup of ice water and add the egg to it.  Beat the two together and set aside.  Get the butter from the freezer and add it to the flour.  Use a pastry cutter to break up the butter and incorporate it into the flour mixture (if you don't have one you can use your fingers.)  Pour in the egg and water mixture and stir everything until it is all combined.  If it seems too dry, add a tablespoon of water at a time until it is the right consistency.

Roll it out the same as the above description. 

If you are filling it before it's baked then you are all done!  You can make a pretty edge by folding the edges underneath and crimping them with your fingers or use a fork to make little lined impressions.  If you need to bake it first without a filling, poke holes in the bottom with a fork and bake it at 375 degrees for 10 to 12 minutes. 

You would roll out the other half and the same as the first and use it to top the pie or save it between two piece of wax paper and store it in the freezer until you need a pie crust for another time.  I hope you enjoy this easy, healthy crust!
 

Tomato Soup


I love having a delicious bowl of tomato soup with a grilled cheese sandwich on a cold day.  The sandwich is an easy item to make processed free - use Ezekiel bread and non-processed cheese toasted in a pan with organic butter or coconut oil.  As for the tomato soup, you could make that from scratch, but who has the time for that, especially with little kids tugging on your shirt that they are hungry now!  In the past, I used condensed cream of tomato soup from a can, but if you read the list of ingredients you will find you can't even pronounce most of them.  This said to me that I needed a much healthier alternative, and I found one.  The company Imagine makes a tomato soup that you shake, pour, and heat with organic ingredients and nothing artificial.  My family loves it and it's even easier to make than the canned soup.  Plus, anything you don't use, you close the lid and put in the refrigerator for another time.  Super easy!  Now we can have this favorite anytime we want and I always feel good about it.  I can even find this in the regular grocery store in the "health food" section.  Give it a try, I don't think you'll go back to the cans again!