Showing posts with label grain free. Show all posts

Saturday, August 3, 2019

Million Dollar Bars


We have a family night every week that includes a treat.  This is my kids favorite part, but my dad can have little to no sugar, so he usually doesn't eat the dessert.  I wanted to make him something that he could enjoy with everyone, so million dollar bars, done the processed free way, seemed the perfect answer.  I think he was near tears that he could actually have dessert with us.  Everyone loved these and they have been a regular request by all ever since!

Crust:
1 cup almond flour
1/4 tsp. salt
1/4 tsp. baking powder
2 Tbsp. melted butter
1 egg

Caramel sauce:
1/2 cup butter
1/4 cup pyure sweetener
1/4 tsp. salt
1/2 cup heavy cream
1/2 tsp. vanilla
1 tsp. caramel extract (optional)

Filling:
1-2 cups Lily's chocolate chips
1 cup unsweetened shredded coconut
1 cup chopped pecans


Preheat the oven to 300 degrees.  Make the crust by combining the almond flour, salt, baking powder, melted butter and egg.  Stir until combined.  Grease an 8X8 inch baking pan with coconut oil and press the crust into the bottom and edges with your fingers.  Try and make it even, but it doesn't have to be perfect.  Bake for 20 minutes.

While the crust is in the oven, make the caramel sauce by melting the butter, pyure sweetener, and salt in a small sauce pan.  Bring this to a boil, stirring continuously.  When it changes color from a yellow to brown, turn off the heat. This will take a few minutes.  Add the cream, vanilla, and if you have it, the caramel extract.  (These are perfectly good without the caramel extract.) This will bubble, then settle back down.  


Mix the chocolate chips, coconut, and pecans in a bowl until they are well combined.  Next, pour a small amount of the caramel onto the crust and then add all of the filling, spreading to make it even.  Top with the remaining sauce and return to the oven for 5 to 7 minutes. 


I prefer to let these cool before cutting and serving them.  In fact, I even make them ahead of time and put them in the refrigerator.  I think this makes for cleaner, more solid cuts, but if you prefer them warm and gooey, go for it!  I typically cut these into 16 pieces (4X4), but you can cut them into whatever size you want. 

Gyro Lettuce Wraps


I love gyros!  I first had one when I was young and we lived in Europe.  Everyone pronounced the sandwich differently, but I quickly decided that it was delicious - no matter how you said it's name. My husband and I have been cutting out some carbs, but I really wanted a gyro.  So instead of saying, we can't eat that, I decided we could still enjoy all those fantastic flavors without the bread.  And these did not disappoint!  In fact, I didn't miss the bread - and I love bread. These were also ridiculously fast to make.  I think I had dinner on the table in less than 10 minutes!

gyro meat
butter, Boston or bib lettuce
chopped tomatoes/cherry tomatoes
sliced cucumber
thinly slice red onions
Tzatziki sauce (homemade or a clean store bought option)

Warm the gyro meat and assemble the lettuce wraps by layering the meat, tomatoes, cucumber and onions into a lettuce cup.  Drizzle the sauce over top and enjoy!

(The picture doesn't show it with onions because my husband doesn't like them, but they are a good addition.)

BBQ Chicken Salad


When I first got married, a good friend of mine gave me a recipe box with a few of her favorite recipes.  This chicken salad was one of them.  It is easy to make and everyone I have made it for always loves it.  Depending on each ingredient you use, this can be personalized to make it processed free, paleo, keto, low carb, etc.  Even vegetarian if you omit the chicken!  That also makes this a good option if you need something for guests and you don't know what kind of diet they are on.

shredded chicken
lettuce/salad greens
tomatoes
bell peppers
avocados
black beans
corn
cheese
tortilla chips

Dressing is equal parts:
BBQ sauce (homemade or low/no sugar)
Ranch dressing (homemade or as clean as possible)

This can be assembled and tossed together in one big bowl or it can be individually put together by each person.  Then they can add as much or as little of each item that they want, kind of like a buffet-style salad.


Tuesday, May 8, 2018

Philly Cheese Steak Peppers


Okay, these pictures are not the best, but this little stuffed pepper, was SO good!!  We are trying to eat less grains around here for different health reasons, and this really gave us all the flavors of a Philly Cheese Steak Sandwich without the bread.  We lived in Pennsylvania for three years and grew accustomed to this great sandwich where they ask you, "Do ya want it wit or wit-out da wiz."  Those were good times. Now we can relive them with a great tasting, processed free version anytime!

4 bell peppers cut in half (any color)
2-3 Tbsp. butter
1 package of mushrooms sliced or diced
1 sweet onion thinly sliced
2 cloves garlic, minced
16 slices of Provolone cheese
1 package of thinly sliced Philly Cheese Steak Meat
(If you can't find this, thinly slice a tender cut of steak to mimic the traditional texture)

Cut the peppers in half and lay them in a lightly sprayed 9X13 baking dish.  Bake for 30 minutes at 350 degrees.  While these are baking, saute the mushrooms and onions in the butter and season with salt and pepper.  Once these are soft, add the garlic and the meat.  Season again with salt and pepper and cook the meat until it is cooked through.  If there is any liquid in the pan, just keep it sauteing until the it has cooked down..


Once the peppers come out of the oven, line each of them with a slice of cheese and spoon the meat mixture in each one.  Top with another slice of cheese and place under the broiler until the cheese is nice and melted.


If you like Philly Cheese Steak sandwichs, I think you'll really love this bread-free version.  I recommend NOT adding "da wiz" aka cheese wiz to this so that you keep this processed free, but if that's how you like it, it may feel all the more authentic to you.  I, myself, was never a wiz girl.  But, suit yourself! Enjoy.


Tuesday, January 3, 2017

Potato Salad


I know everyone thinks their mom's potato salad is the best, and I guess I'm no exception.  Our whole family swears by this simple, yet delicious version with no fills or fuss.  To me, this will always be the way potato salad should be - thanks Mama!  

4 lb. bag red potatoes
1 dozen eggs
3/4 of a 15 oz. jar of mayonnaise (I like safflower mayo or Veganaise)
salt and pepper

First, hard boil the eggs.  In a medium pot, place the eggs and cover with cold water.  Bring to a boil, then turn off the stove and cover for 12 to 13 minutes.  Pour out the warm water and run the eggs under cold water.  Peel and chop.  Set aside.  Dice the potatoes (you can peel them first, but it's more nutritious to leave the peel on) and put them in a large pot.  Cover with water and add salt - potatoes need salt!  You'll also be able to add more later if you need to.  Cook until tender.  Drain in a colander and run cold water over the top.  Stir the eggs, potatoes and mayo together with salt and pepper to taste.  The egg yolks will mix with the mayo and make the most delicious, creamy sauce.  Check for seasonings (especially if it needs more salt) and you're ready to serve!


Wednesday, February 10, 2016

Tacos Without The Shell


I've mentioned several times that my husband is supposed to have little to no grains for his health.  I was craving tacos the other night, but didn't want to make him feel left out if the kids and I had a taco shell - even if it was processed free.  My solution was to find a different kind of shell.  Besides, the shell is really just a vehicle for all the yummy taco goodness inside anyway.  I ended up swapping it for for lettuce and the results were amazing!  No one missed the shell - not even a little.

shell swap - Boston, bib or butter lettuce leaves
taco meat the way you like it (I like lean ground turkey with my homemade taco seasoning)
toppings: tomato, cheese, sour cream, guacamole, etc.

This was a super fast dinner to make and one we all enjoyed.  Be sure to make your own taco seasoning if you choose to use it, otherwise this won't be processed free.  I'm not saying we'll never have a taco shell again, but this was a fabulous alternative.

Friday, January 29, 2016

Coconut Flour Popovers


I think popovers are really delicious, easy, and fun.  My kids love to watch them puff up through the oven door and sink a little as they cool.  We are trying to eat less grains because of my husband, so this recipe is in his honor.  The addition of the coconut flour will make these slightly different from a regular popover, but they are still really easy and delicious.  Plus, it's always good to know a processed free version of any recipe, right?

2 Tbsp. butter
4 eggs
1/2 cup milk (use almond or coconut if you are dairy free)
3 Tbsp. coconut flour (accurately measure - don't approximate with this flour)
1/2 tsp. sea salt

Preheat oven to 425 degrees.  Cut off one tablespoon of cold butter at a time for a total of two, and slice each one in half, then each half into 3 pieces.  This should make 12 equal-sized, small pieces of butter.  Place each one inside a 12 count muffin tin and place this in the over to let the butter completely melt and the pan to heat up.  Watch that you don't allow the butter to burn while you are making the batter.  In a blender, pour in the eggs, milk, coconut flour, and salt.  Blend until smooth.  Remove the hot muffin pan with the melted butter and pour in the batter filling each cup about half full.  


Bake for 20 minutes or until puffed and golden.  Don't open the oven door while they are cooking or they will deflate and not rise again.  They will look very puffy when done, but shrink down as they cool.  You can eat these plain or top with an all fruit jam (no added sugar), more butter, or my favorite - a squeeze of fresh lemon juice and drizzle of real maple syrup!


Thursday, September 10, 2015

Cauliflower Pizza Crust


We have all been trying to go grain-free because of my husband and add more vegetables to our meals at our house.  I had really been wanting to try a cauliflower pizza and this gave me the perfect opportunity.  After doing a little research and tweaking this to my own preferences, our recipe for cauliflower crust pizza was born.  This has many steps, but all of them are easy - in other words, this is not fast, but it is simple.  It's also surprisingly filling - must be all the veggies.  My favorite thing is that it is processed free.  Let pizza night begin!

Makes 2 medium pizza crusts

1 large head of cauliflower
2 eggs (beaten)
1 cup shredded mozzarella
1 tsp. fine sea salt
1 tsp. Italian seasoning
1/4 tsp. black pepper

Toppings of your choice: sugar free pizza sauce, cheese, shredded zucchini, olives, bell peppers, mushrooms, pepperoni, ricotta cheese, etc.

Preheat oven to 450 degrees.  Line a baking sheet with parchment paper and liberally grease it with olive oil.  Chop the cauliflower into small pieces and pulse until finely chopped in a food processor - not pureed though.  Pour into a microwave safe bowl and heat for 8 minutes then let it cool enough to handle. 


Put small batches into a tea towel and twist to remove as much moisture as you can - it has to be dry!  You may have to do this in several batches like I did.


Transfer to a bowl and add the other ingredients.  Shape into two crusts on the oiled parchment and bake for 15 to 17 minutes. 


Should be slightly golden.  Cool a little and add your toppings.  Bake again for 10 to 15 minutes or until the cheese has melted and started to bubble.


Feel free to experiment with your own seasoning and toppings.  I also think this is easier eaten with a fork rather than picked up like a traditional pizza slice.  Give this a try - you may find you like eating more veggies! 

Wednesday, July 22, 2015

Bean Pasole


Everyone needs a few recipes that can come almost entirely from the pantry.  This is one of those recipes - you can basically have everything on hand you need to make it without a shopping trip.  This is something I keep in my hip pocket for a day when I don't feel like cooking, haven't been to the store, or don't have time to babysit the process.  The basics of this soup came to me from my friend Amanda.  She delivered this to my house one day when I was horribly sick.  My whole family loved it and I asked her for the recipe.  It only took minor changes to make this processed free and now we eat it all the time! 
 
2 - 15 oz. cans hominy (rinsed and drained)
2 - 15 oz. cans of beans (pinto, navy, kidney, etc.) I usually choose 2 different kids to look pretty
32 oz. container (4 1/2 cups) reduced sodium chicken or vegetable broth
16 oz. jar of thick and chunky medium salsa (no sugar added)
2 tsp. dried oregano
1/2 cup heavy whipping cream (or 6 Tbsp. milk + 3 Tbsp. butter)
 
optional toppings: cheese, avocado, tortilla strips, chopped cilantro, etc.
 
Put all the ingredients, except the cream, into a crockpot and cook on low 7 to 8 hours or on high for 3 to 4 hours.  30 minutes before serving, pour in the cream, stir, and recover.  Serve as is or add some additional toppings. 
 
Truth be told, I almost never add any other toppings because I haven't been to the store to get them.  Sometimes it's just a sprinkle of cheese.  You could also easily add some leftover roast, pork, or chicken to this if you are looking to use up a small amount of cooked meat.  This is very forgiving and ridiculously fast and easy.  
 

Saturday, May 2, 2015

Chicken and Quinoa Lettuce Wraps

 
I found the idea for filling lettuce wraps with quinoa on pinterest and thought it was a brilliant idea!  My husband is supposed to go grain free for three months and I've been trying to put together recipes and meal plans that include three criteria: processed free, grain free, and delicious!  These lettuce wraps absolutely qualify.  These are also very kid friendly which is a bonus.
 
3 large chicken breasts
3 Tbsp. extra virgin olive oil
1 Tbsp. toasted sesame oil or regular sesame oil
4 Tbsp. liquid aminos or low sodium soy sauce
3 cloves of garlic, minced
1 tsp. freshly grated ginger or 1/4 tsp. ground ginger
 
2 heads of lettuce - Boston, bib or butter
shredded carrots
shredded or sliced cucumber - I like English cucumber because they have less seeds
chopped cilantro
peanut sauce
 
Combine the olive oil, sesame oil, liquid aminos, garlic, and ginger in a gallon size zip top bag.  Add the chicken breast and seal it up.  Squish around the marinade ingredients so that the chicken is completely coated and let it sit in the refrigerator for about 20 to 30 minutes or longer.  While you wait, cut the veggies, put them on a platter, and make the peanut sauce (here's my easy two ingredient recipe).  Cook the chicken breasts in a couple tablespoons of coconut oil.  Then move to a cutting board and let them rest for a couple minutes before cutting them.  You can cut them in strips or cubes - doesn't matter.  I consider this an assemble yourself dinner, but for the kids, they liked everything separate with no sauce.  Whatever suits your fancy!


Quinoa in the Rice Cooker

 
My life just got even easier the day I learned you could make quinoa in a rice cooker!  I know it's not that complicated on the stove top, but how much better is it to throw everything in and just walk away.  That's my favorite kind of cooking!  Plus, this is ready in about 15 minutes, so I can turn it on, prep the rest of the meal and in no time everything is ready to eat.  Here are the basics, but you can play around with the ratios to make this how you prefer.
 
1 cup rinsed quinoa
2 cups liquid
1/2 tsp. salt
 
Do not skip the step of rinsing the quinoa or it will be kind of bitter.  Just pour it in a fine strainer and rinse in the sink - this will only take you about 30 seconds.  As far as the liquid goes, I use one cup water and one cup chicken stock, but you could use all water, all chicken or vegetable stock, etc.  Dump it all in the rice cooker, put on the lid, and press the button.  Done to perfection!
 
If you are trying to go grain free, this is a fantastic substitute for rice in just about any dish.  It's also good all by itself.  Get creative and add all kinds of chopped veggies, vinaigrettes, seeds, nuts, cheese crumbles, etc.  Plus, quinoa is high in protein - great for my whole family!

Sunday, April 26, 2015

Cauliflower Leek Soup

 
I saw the idea of this soup on pinterest, but there were no exact measurements to recreate it.  I love discovering recipes that include more vegetables and can be processed free, so I played around with this until I figured out a soup I liked and could recreate.  This is super fast and easy, but you don't have to admit that if you don't want to!

3 Tbsp. butter or coconut oil
8 oz. bag of clean leeks chopped, or 2 leeks cleaned and chopped
2 cloves of garlic, crushed
1 head of cauliflower, cut into smaller pieces
32 oz. package of chicken or vegetable broth (4 1/2 cups)
salt and pepper

In a pot, saute the leeks in the butter/coconut oil until soft.  Add the garlic and saute another minute. Add the cauliflower and chicken broth and cover the pot.  Cook until the cauliflower is soft, about 10 minutes.  Uncover and blend in the pot with an immersion blender or in small batches in a regular blender.  Add salt and pepper to taste.  This will need some salt, so don't forget it!


You can add some toppings if you want.  My suggestions would be a drizzle of olive oil, freshly grated parmesan cheese or cheddar cheese, maybe a sprinkle of bacon or freshly chopped parsley.  This soup is good on it's own, but looks fancier with toppings. 

Monday, March 23, 2015

Steak Fingers

 
If you like steak - you have to try these!  This was a gold-star, family favorite growing up (when can you please seven kids?!) and still is for my family too.  Steak fingers are another one of my mom's recipes that I decided to see if I could make processed free.  These are breaded, pan-fried pieces of meat that are SO delicious and make you feel comforted deep down.  But with breading and oil come a lot of problems.  Here's another example of how a few swaps can save the day! 
 
 
1 cut of top round/round/top sirloin/sirloin steak  (my favorite is sirloin - it's the most tender)
2 eggs + 1 Tbsp. water
1 cup flour of your choice (I'll explain below - just not refined white flour!)
coconut oil
salt and pepper
 
Cut the steak into roughly 3/4 inch strips - does not have to be exact!  Lightly season with salt and pepper.  In a large frying pan, melt enough coconut oil over medium heat that it fills the pan about 1/4 inch high. 
 
 
Now you'll want to create a little assembly line on the way to the pan.  Beat the two eggs and water together in a shallow dish and season with salt and pepper.  In a separate dish, add the flour of your choosing and also season it with salt and pepper.  Here is the beauty of this recipe - I don't cook with refined white flour anymore.  I have tried every other flour in my pantry with this recipe and they have all tasted great!  I have made these with whole wheat, spelt, coconut, and almond flours and they were all good.  So decide what flour fits your needs when it comes to the type you want to use.  


Dip the steak into the egg wash, then dredge it in the flour.  Shake off the excess flour otherwise it will build up and burn in the pan. Season it again with salt and pepper after you place it in the pan.  It will take only a couple minutes on the one side, then flip and lightly season the other side too.  These cook up really fast.  You'll know when they are done because the coating will turn golden brown.  (Note: I like to use two sets of tongs - one for dipping in the egg and flour, and one for cooking in the pan.  This will save your fingers from becoming a complete mess!)


Drain these on a plate lined with a double layer of paper towels.  Because you are cooking these in batches, I like to loosely place a piece of aluminum foil over the plate to keep them warm.  I find that I have enough to fill the plate then add a second layer of paper towels and continue the process. 

 
When you have cooked them all, they are ready to eat.  My family is split on how to eat them.  Some like them just how they are and some like to lightly dip them in steak sauce, which is not completely clean, but delicious.  You can make a homemade, cleaned-up version of steak sauce, it just takes a little more time, but I think it's worth it if you prefer these with sauce.  If you like them plain, you're good to go!  This will serve about 4 adults.  


Thursday, January 15, 2015

Zuppa Toscana


I think it's because of the winter chill and snow, but warm soup just seems perfect right now.  I love that it feels like it's thawing  you from the inside out.  This soup has always been one of my favorites.  I love the hearty chunks, creamy soup base, and fresh kale!  I did my homework and worked out how to make this as simple as possible and processed free.  Now, it's my new favorite soup!

1 lb. Italian sausage
1/2 to 1 tsp. red pepper flakes (to your tastes)
4 slices of bacon, chopped
1 large onion, diced or pureed
3 garlic cloves, minced
2 boxes (32 oz.) chicken broth
2 cups water
3 large russet potatoes, unpeeled and cut into small chunks
1 1/2 cups heavy whipping cream
liberal sprinkling of white pepper
1/2 tsp. or more of salt
3 cups of chopped kale

In a large pot, sauté the Italian sausage and crushed red pepper.  Remove and set aside.  If your bacon is uncooked, add it to the pot then add the onions and garlic, If your bacon is already cooked, add the onions and garlic first and cook down, then add the bacon.  Once everything is cooked, add the chicken broth and water and bring to a boil.  Add the potatoes and cook until soft - this will take between 10 and 20 minutes depending on the size of your potatoes.  Add the heavy cream and sausage and heat through.  Add the white pepper and salt.  Check the seasoning to know if you want to add any more.  Stir in the chopped kale right before serving to keep it nice and bright green and stop it from wilting too much.

This soup is also very forgiving.  For instance, you could leave out the bacon entirely or add twice as much kale.  It will still taste great.  I think that might be my favorite thing about soups all together, almost anything works! 

Wednesday, January 14, 2015

"Refried" Beans

 
I love refried beans!  I am from the Southwest and this is one of the staples to the region.  I do not, however, like canned refried beans - never have.  They taste stale and too doctored.  Refried beans should be simple and clean in flavor.  Let the beans be the star.  My mama taught me how to make her recipe, and they couldn't be simpler!  Of course, they are processed free and you only need three ingredients.  The best part is there is no frying involved.  Put easy "refried" beans on the menu!
 
2 lbs. dried beans (pinto or pink)
water
2 Tbsp. sea salt
 
Pour the dried beans in a large pot.  Now add about 3 times as much water as the beans.  You need a lot of water because the beans will soak them up.  Bring this to a boil, then turn this down to a simmer with the lid slightly ajar for about an hour and a half.  Occasionally stir it, but don't feel like you have to babysit this at all.  After that time has passed, it should look something like this.  The beans have soaked up a lot of the water and are getting soft.  Now, stir in the salt.  You can't add the salt at the beginning or it will make the beans kind of tough. Put the lid back on, slightly ajar and let this simmer another hour to hour and a half.  
 

The beans will have soaked up even more water and been seasoned by the salt.  Turn off the heat and mash the beans.  You can use a potato masher, a blender, a food processor, whatever you have.  I like to use my immersion blender and puree them right in the pot.  If they seem too dry at any point (during cooking or blending) you can always add a little more water.  That's it!  Told you it was easy.

 
Here are a few ways to use them: make bean burritos, dip or layered dips, Mexican pizzas, tostadas, soft or hard tacos, add them to soup, use them in casseroles, etc.  These are also the perfect side dish for a Mexican feast.  I personally love to smear these on homemade Indian Fry Bread!  Another bonus is that ALL my kids like these beans - that makes this a winner of a recipe.  They also freeze really well, so don't throw our any left overs.  Whether you have a lot of dried beans lying around, want another option besides meat or just love refried beans, I hope you'll give these a try!


Monday, September 22, 2014

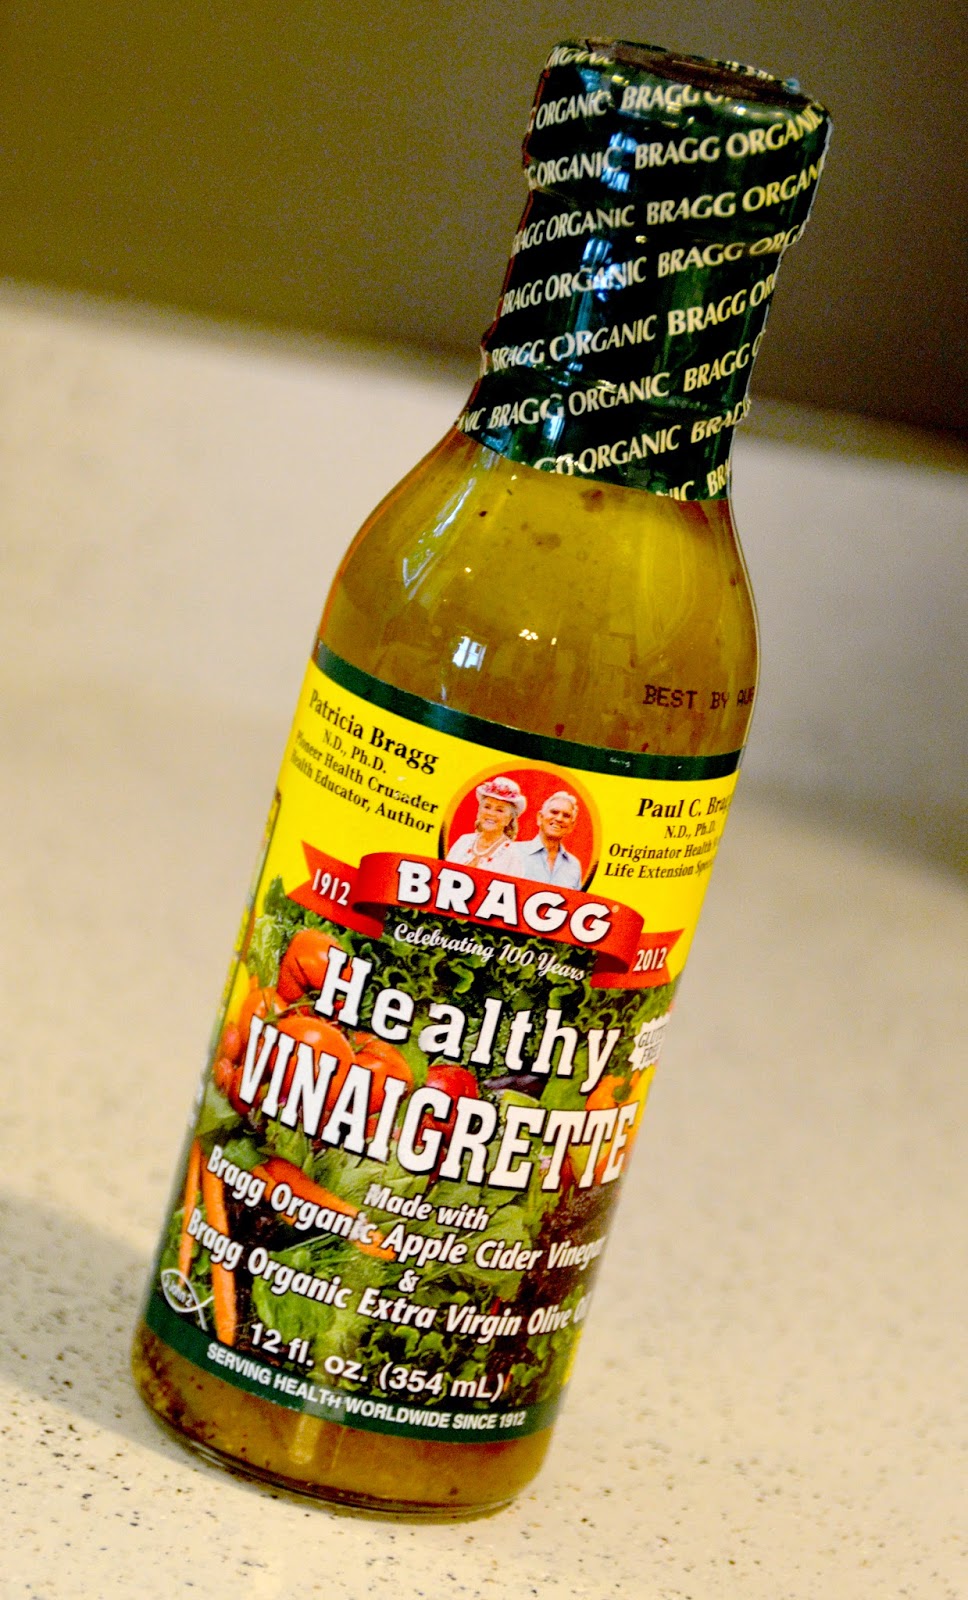
Healthy Store-Bought Dressing

 
I like a homemade salad dressing, but let's be serious - who always has time for that?!  Or all the ingredient on hand.  Let me tell you about my go-to salad dressing.  This is my favorite because I can pronounce every ingredient and they are foods I would put in my body anyway.  It's Bragg's brand healthy vinaigrette.  I put this on every kind of salad I make.  It pairs really well with savory or sweet salads and the best part is I didn't have to make it from scratch.  This makes having a big salad everyday super easy.  Here's what's in it: organic apple cider vinegar, organic extra virgin olive oil, purified water, organic honey, organic garlic, liquid aminos, organic onion, organic black pepper and natural xanthan gum. 
 
 
I have been up and down the salad dressing section of my local grocery stores and never found a good alternative that is processed free.  Well, look no further.  Here are three other kinds that boast an ingredient list just as good as the healthy vinaigrette.  Now you can get berry, Hawaiian, and ginger sesame dressings without having to make them yourself all the time.  This also gets bonus points for being available in almost every grocery store, just look in the health food section.  Talk about clean and easy!

Sunday, March 30, 2014

Kalua Pork


I spent an entire summer on the island of Oahu in my early twenties.  Let me just say, after experiencing the beauty, the food, and the warm people of Hawaii, you will want to be Hawaiian!  Kalua pork was one of my favorite dishes to eat with friends.  It's traditionally cooked in a pit in the ground, but since I'm not a huge fan of altering my yard that much, this recipe gets a friendly substitution of the slow cooker.  I also love that this version has only three ingredients!  Don't be surprised when this processed free dish has you doing the hula.

4 to 6 lbs. pork roast (pork loin, shoulder, etc.)
1 Tbsp. liquid smoke
2 - 3 tsp. salt (Hawaiian or smoked if you can get it)

Score the roast and place it in the slow cooker.  Rub it with the salt and pour in the liquid smoke.  Cook on low 8 to 10 hours.  When it's done, pull it out of the slow cooker and shred it.  Add it back into the slow cooker with all the juices and stir it all together.  Now it's ready to serve. 

This is so versatile.  Serve with brown rice, make into kalua pork sliders with some homemade BBQ sauce, add it to salads, use it for pork tacos... the possibilities are endless.  This will make a good amount, so play with this tasty treat while you plan a trip to the islands!

Green Curry Chicken


This recipe has got to be one of the most requested by my husband ever!  I have to admit that I love it too, but it feels amazing when someone else loves a dish you make.  You feel kind of like a little gourmet chef in your own home.  This dinner offers the delicious flavors of Thai food, and I have to say, it tastes just like a dish that we used to order from a favorite restaurant of ours.  Who knew it could be so delicious, easy, and processed free! 


3 chicken breasts cut into small thin strips
1 to 3 Tbsp. green curry paste (less = mild, more = spicy)
1 Tbsp. fish sauce
1 can coconut milk
1/2 cup chicken broth
1 can bamboo shoots
3/4 cup frozen peas


In a large pan, brown the chicken in a little bit of coconut oil.  Make sure to season with salt and pepper.  Once it's cooked, make a space in the middle to sauté the curry paste mixture.  Add the curry paste, fish sauce, coconut milk, and chicken broth.  Stir until the sauce has combined then add the bamboo shoots.  Allow the sauce and chicken to simmer for 15 minutes to concentrate the flavors and thicken.  In the last few minutes, add the frozen peas to warm them through.  Serve with brown rice.

You may want left overs because this tastes just as good if not better the next day.  Feel free to add some cooked potatoes and garnish with shaved cucumber.  Now all I need to do is finish the dinner with some coconut ice cream with chopped peanuts and we have a complete date night at home!

*Note: If you are trying to go grain free, this is delicious on it's own or over quinoa instead of rice.


Thursday, January 9, 2014

Chocolate Covered Strawberry Yogurt


This has to be one of the easiest and most satisfying yummies you could make.  I love Greek yogurt, but when you want something sweet, it does have to be doctored a bit.  This is where all those processed free tricks come into play.  One of my heroes, Dee McCaffrey, talks in her book about how she makes vanilla yogurt by adding pure vanilla extract and stevia to plain yogurt and voila, vanilla yogurt without the added sugar!  I've been doing this for years now and let me tell you, the yogurt combinations are endless. (Get her book, The Science of Skinny - life changing!)

I was inspired by the lovely treats associated with Valentines Day and thought this would be delicious.  And oh, how I love you chocolate and strawberries!  It's simple: make your homemade Greek vanilla yogurt to your taste (start with 4-5 drops of stevia and a 1/4 tsp. vanilla and add from there,) cut up strawberries, and dark chocolate chips.  That's it.  This comes together in no time!  You can also use grain-sweetened chips or carob chips if you prefer.   The mini chips are wonderful too!


Wednesday, September 4, 2013

Vegetable Parmesan


Are you looking for recipes that include more veggies? I'm always on the lookout to bump up this important food group in my families meals.  This vegetable parmesan is meatless and stars plenty of vegetables with a terrific Italian flavor profile.  I got the basic recipe from Giada and changed just a few ingredients to make this perfectly processed free and delicious!
 
Coconut oil
Sea salt and pepper
1 medium eggplant
2 fennel bulbs
3 bell pepper (preferably all different colors)
1 (26 oz.) jar marinara sauce (no sugar added)
3 cups shredded mozzarella cheese
1 cup freshly grated parmesan
1/2 cup whole wheat panko or whole wheat bread crumbs
 
Slice the eggplant and fennel into 1/4 to 1/2 inch thick slices.  You may want to discard a few of the outside layers of the fennel bulbs to make them more tender.  Cut the peppers into flat strips.  Don't they all look beautiful? 
 

Now you will do one of two things.  You can either grill all the vegetables or bake them in the oven.  I chose to grill mine like the original recipe.  You want to grease your grill or grill pan with coconut oil and season the vegetables with salt and pepper.  Grill them for about 3 to 4 minutes on each side or until they have softened.  If you don't want to grill them, put them in a baking dish at 375 degrees for 15 to 20 minutes or until soft.  Don't forget to still season them.  I like the flavor that grilling them offers, but do whichever is easiest.


Just a quick note: you could always grill or bake these in advance and assemble the rest of the casserole later.  Preheat the oven to 375 degrees.  Now your ready to create the layers.  Spread 1/3 of the marinara in the bottom of a 9 X 13 inch baking dish that has already been greased with coconut oil.  Arrange a layer of eggplant slices and sprinkle 1 cup of mozzarella and 1/3 cup of parmesan over the top.  For the second layer, add the bell peppers, followed by another 1/3 of the marina, 1 cup of mozzarella, and 1/3 cup of parmesan.  For the last layer, add the fennel and top with the remaining sauce and cheeses.  To finish it, sprinkle on the bread crumbs.  You can drizzle a little olive oil on top too.  Bake for 30 to 35 minutes or until the top is golden.  Cool for 10 minutes before serving.